Showing posts with label sewing. Show all posts

Wednesday, March 4, 2015

Restyle: How to make curtains longer


I found this blog post in the archives, never published, but written months ago. Luckily, it was not the kind of post that gets outdated, so here it is.

For our bedroom update we decided on a simple solution for our clothes storage. Instead of buying a new wardrobe, we used dressers and furniture I already had. But the results looked a little messy, so I thought it would be perfect to hang some curtains to hide everything, and maybe keep the dust at bay a little more.

We found some cheap curtains on sale, but forgot to check the length, and they ended up being about 15 cm too short. In addition, they had loop tape on the back, which wouldnt really work with the curtain rods. The solution was to add fabric hoops on the top, and also take the hem down some.


Cut strips of fabric twice the length you want + 6-10 cm for seam allowance. Fold lengthwise, sew down the middle and turn inside out. Press the seams in the middle.


Sew onto the top of the curtains. I placed one loop every 10 cm, using 10 loops for each curtain. Voilá, curtains that reach from the floor to the ceiling!


Monday, March 2, 2015

Curing my home: February update

I wrote about the January Cure in February, and here is an update on where I am at. The list is still not completed, but I am working on it. Lately I have tried to focus on my studies as well, which means less time for home projects (and blogging).


What I did in February: 


- Hanging a Peruvian blanket.  
This project has the most visual impact of all this cure. It was quite easy actually, but it took me a while to just get it on the wall.... Here is how to do it, and here are some more pictures of the hallway.

- Deep clean the bathroom. 
This was so nice to get done! I had already cleaned and cleared out of the cabinets earlier in the cure, but it still took me 4-5 hours to clean everything else, including the ceiling and walls, and even under the washer. It was hard work, but so worth it to have a squeaky clean bathroom.

- Get a lamp for the balcony.
We kind of did this. Its a temporary fix, and not a pretty lamp either, but now that the days are getting longer and brighter it might not happen until fall.


Still to be done: 

- Finish deleting digital files.
This is a very large task, but I am happy to have gotten rid of about 60 GB of duplicate pictures, music I don´t really like, unused programs and more. It was a great help to download DiskInventoryX, which showed me what was hiding on my computer. There are still a few thousand pictures to go through, so I am not quite done, but my computer seems a lot happier, and faster! I have also cleaned up a lot of my email folders, and also been better at deleting emails as I go, so that is an improvement.

-  Make a family picture gallery wall!
I have started by framing an old picture of my parents from when they were about 20. I know what I want, but need to choose pictures, get them printed and framed, so it certainly is a work in progress.

- Purge, clean and tidy the loft bedroom/craft space. Mike has done his part, but I have barely started. It sure is a daunting task.


- Organize the hallway closet. Hmmm... I will get to this one day, maybe when I pack away the winter coats and boots?

Sunday, March 1, 2015

How to hang a rug on the wall


If you have a rug, blanket, or other textile you would like to hang on a wall, here is one way of making that happen. You should not nail it directly to the wall, as it might rip from the strain, so though it sounds like a simple solution, it will not last. Here is how I hung my Peruvian blanket. 


Materials: 
Your rug/blanket
A piece of wood trip the same width as your textile
Sanding paper
Velcro the same width as your textile
2 eye hooks
Glue/nails and a hammer
Needle and thread
Fishing line or other rope


Step 1: 
If you have good glue, use it to attach the hooked end of the velcro to your trim. You can also use small nails like I did. Remember to sand your wood first! 


Step 2: Attach an eye-hook to each end of the wood trim.


Step 3: Sew the other end of your velcro to the textile. This is the most time consuming task. Just be patient, and use a good, sturdy needle.

Step 4: Attach the two pieces of velcro, and hang your rug on your wall! 


Wednesday, September 17, 2014

What I Wore: Wedding Edition


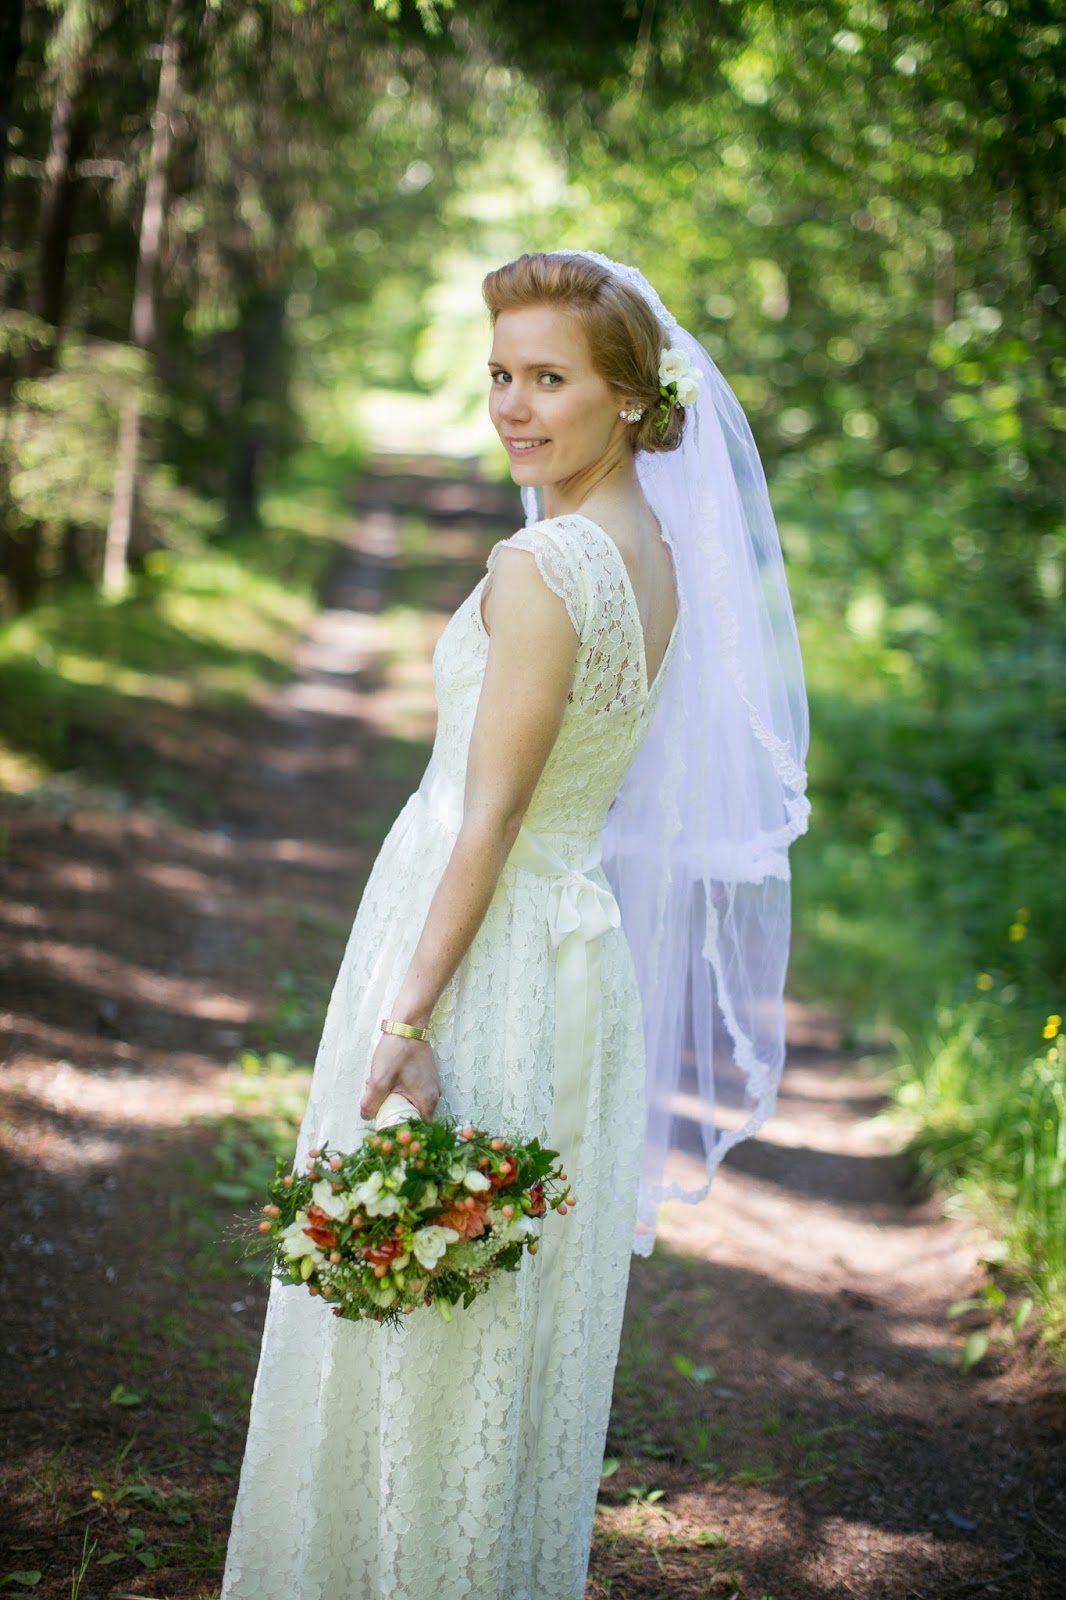
Finally I can share details of the dress that I worked on for so long! My wedding dress was a cap sleeve, ivory lace, round neck, sheath gown with a sash - to use all the wedding terminology... The store didn´t have my size, so it had to be taken in a little, which I decided to do myself. This was a lot harder than I had thought, mainly because I wanted it to be impeccable. In the end I settled for about 99% satisfaction, and with only a week left before the wedding there wasn´t really anything else to do about it. I loved wearing the dress, it was light and airy and comfortable, not heavy and itchy like many of the other wedding gowns I tried on.


Another challenge was that the fabric was very thin, so I had to add extra lining. I found the perfect silk slip to go underneath, and when everything else was done, I basted it to the dress and plan to remove it so I can reuse it for something else later. I also changed the back of the dress to make a V-neck instead of a round collar, added lace to make tiny cap sleeves, and a ribbon sash around the waist. More on the dress process here. 


I loved my vintage accessories. Early on I knew I wanted to wear the bracelet my grandma gave me. I also wanted to have something borrowed, and was lucky I got to choose between several vintage pairs of earrings from Mike's family. I settled for a pair of white rhinestone clip-ons from the 1950s, but there were some other really pretty ones too.


I was very happy I had a cardigan. Despite the sunny weather, Ålesund was quite windy on June 28th, and because of the sun we had to resort to pictures in the shade. I had first scoured Etsy for hours to find the perfect, fun and vintage cardigan. I found it, ordered it... but it never arrived! So a week before the wedding I went to the closest mall, found a very plain peach cardigan and settled with that decision. In addition, for parts of the photo shoot I was actually wearing long-johns! You can't see it, but it's there.


Matching shoes and nail polish with my maid of honor was the closest I got to a cohesive bridal party look. (Though I did make sure the best man had a neutral colored tie.) But since we were all wearing flowers I think that settled the matter if anyone was in doubt. 


I wore the veil for the ceremony and some pictures, but decided to leave it off for the rest of the day. To be honest, a veil is kind of in the way, especially if there is any wind or lots of hugging involved. The cap and lace matched my ivory gown, but the tulle itself was a very different shade of white. It is more noticeable in the pictures than I thought it would be, but that´s not a big deal.

My wedding garb was really a DIY and budget effort. In total, the outfit cost me around 4000 kr, and a little more than half of that was for the dress and everything I needed for alterations. An added bonus is that with some minor updates, everything but the veil can be used again. Or is there any other occasion than your own wedding that calls for a juliet cap veil?? It would be sweet to use it again.

Dress: A Dolce & Gabbana knock-off from a small dress shop in Tallinn, Estonia
Slip: Else Maries Undertøyssalong, Skien
Veil: Vintage, via Adorned in Grace
Cardigan: Cubus
Red sandals: Esprit
White pumps: Vintage (already owned)
Bracelet: Inherited from my grandma
Earrings: Something borrowed - they were Mike's great-grandmothers
Handkerchief: Inherited. Also Mike's great-grandmothers
Hair and makeup: Anniken at Fri Frisør
Flowers: Blomsterstua Ålesund

Photos: Irene Lovund

Sunday, July 27, 2014

Restyle Sunday: Drawstring pouch


"An old shirt with stains that won´t come out, 
gets a new life as a drawstring pouch."

My husband (!) said he wanted a drawstring pouch, and I offered to make him one. I had never done it before, believe it or not, but the construction is really simple. I offered him a few options from my stash of fabric, and he decided on this one from a shirt that got ruined. After making one of these I would like to make a few more. They are perfect for traveling, to keep socks and underwear in one place, or as a shoe bag. This tutorial is for a pouch with lining. If you make it without a lining there will be a lot less work.

1. Cut two rectangles from the back of shirt, one slightly bigger than the other. My measurements were 19,5 cm x 62 cm and 19 cm x 56 cm, but you can scale up or down in any direction depending on what you will use it for.


2. Sew the sides together all the way on your smallest rectangle, but leave 4 cm at the top on the largest one. This is will be the opening for the drawstring.

3. Fold the top of the lining over 1,5 cm and press.
Turn the other pouch so your seams are on the inside, fold the top over 3 cm and press.


4. Flip both of the pouches. With the "wrong side" of the fabric facing each other, put your smallest pouch over the largest. Pin together 1,5 cm from the top, leaving an opening for the drawstring on each side, and sew together.


5. Flip the pouch again, and sew a topstitch along the edge for stability.


6. Thread your strings, tie them together, and you are done!

Wednesday, July 16, 2014

Wedding Garter DIY

For the wedding, I was not planning on wearing a garter, and certainly not do the garter toss - that would freak me out! It seemed like an annoying thing to wear and yet another thing to spend money on, but then one day I looked through my stash of ribbon and realized I had everything I needed to make my own.

You need: 
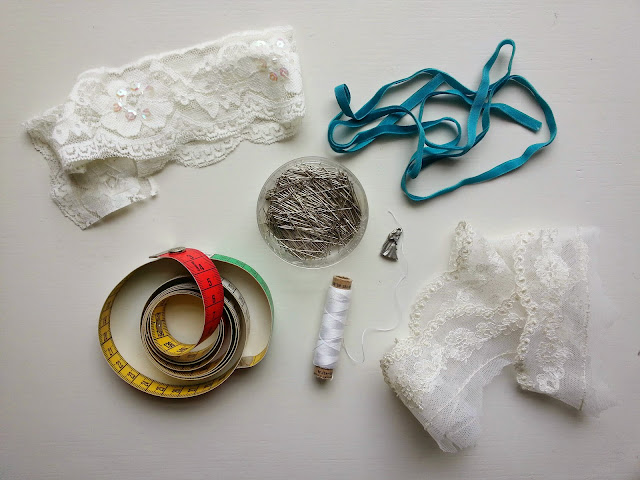
- Elastic lace
- Needle and thread, or sewing machine
- Measuring tape
- Embellishments: Use whatever you fancy, like ribbon, rhinestones,
beads, flowers, charms etc

This is one of the easiest things you can make for your wedding (easier than a DIY veil for example). The project took me about 20 minutes, including taking the pictures!


First, measure your thigh where you want your garter. 
Use measuring tape, or wrap the lace around your leg.

Sew the ends together, with either sewing machine or needle and thread. 
Now try it on to make sure its tight enough! Adjust if needed.


Find your embellishment and decide where you want it to go.


You can sew a small bow like me, and add your something blue.


An easy and cute garter that you can make yourself.

Wednesday, June 11, 2014

Wedding dress alteration, continued


Yes,  lately my feelings resemble the expression on this card... Only 17 days to go!

After talking to my mom about shoes for the wedding I changed my mind and decided to wear white pumps for the ceremony. Considering the veil I have chosen, my fun sandals just wouldn´t work with the outfit. But the plan is to change shoes later, when I take the veil off. If I hadn´t already owned a pair of white pumps I am not sure I would settle for this solution though. And another happy result is that I don´t have to hem the dress! The ceremony is where I would be most worried about tripping, so I think I can live with a little long dress later, as long as it fits when we are in the church. I hope this logic works out practically as well.

In addition to taking the dress in, I also wanted to alter the back. This meant shortening a zipper from the top. Since I am not an expert on tutorials, I will link to a couple here and here.

But then I didn´t know what to do - should I add a sash or not? And what about the pretty lace trim. Ahhhh... Luckily, my maid of honor came over to help me make that decision. I am so close to being done now, which is about time. Pictures of the finished product will have to wait a few more weeks.

PS. For amazing cards for a wedding/any other occasion, check out Emily McDowells shop on etsy.

Thursday, April 10, 2014

Wedding dress update

You might know that I am working on tweaking my wedding dress, so I thought I would come with an update, perhaps only for especially interested crafters. No pictures, but I guess you will be understanding considering the subject.

The extra slip I bought needed a small change in the back to match the dress perfectly. With slippy silk, that took a little longer than anticipated, but turned out very well in the end. Hand-basting is the key here.

The dress was basically two separate dresses, one in a lace fabric, and one a lining/slip. Since I had to take both of them in, it seemed just as easy to make them into one dress with interfacing instead of the two original ones. After careful investigation and research (see blogs with tutorials here and here...) for the dress itself, I decided to rip open a lot of seams and do this thoroughly. What is implied here is that I normally don´t follow all these careful steps, being a lot more careless with my restyled thrift store finds like this skirt.

The next step was basting the lining to the dress by hand. No risks taken here. After trying it on, then more basting and needles and fittings, I could finally sew some stitches on the sewing machine. Now the bodice fits me, almost like a glove, and I am one step closer to a wearable wedding dress. I am optimistic to this project and look forward to continue working on it.

Tomorrow morning we are off for our Easter holiday in Ålesund and Bergen. There will be lots of wedding planning, and I look forward to seeing friends and family. Especially little Øyvind, who called today and said his first words to me: "hello" and "aunt"! Too precious.

Tuesday, February 11, 2014

Bringing back Restyle Somedays with Rugs

Does anyone remember when I had a Restyle Sunday feature? (You can find my previous restyle projects here.) I am thinking of bringing it back, and have a list of projects that I can tackle, but my fiancee gently advised me to make it a "Somedays", not weekly commitment. I am giving it a go, so here is the first project of the new year: Sewing rugs together.

When I first bought these rugs a couple of years ago I imagined that one day I might sew them back together. Ever since that day, it has been a hassle to vacuum them, and they always seem to slide around. I was not the one most annoyed, but my roommate and my boyfriend never liked it. With a new rug for the couch area, it was time to do something about these two. 

Two rugs.

The tools: pinning needles, thimble, scissors, thread, and sewing needles.

Sew large stitches from one end to the other. The rugs will get heavy as you go along, but if you treat them like a sturdy, but cozy blanket, you will be fine. Also, I didnt start pinning until I was well over halfway done. Things were getting a little skewed, but it worked out in the end. Another tip is place the rugs next to each other and use electrical tape on the back to keep them in place while you sew. 

A close up of the slightly uneven stitches. If you choose the right color thread, no one will really know. 


Tada! One large rug!  I see now that some ironing wouldn´t have hurt, but who irons rugs?? 

Do you have any restyle or DIY projects planned? 

Sunday, January 26, 2014

Pins and needles


When I posted about wedding dresses earlier, I got a lot of responses from people who thought I was making my dress from scratch. Lets clear up this misunderstanding: I am merely fixing a dress I bought. Taking it in to fit, hemming it to the right length and perhaps a tweak here and there for a more interesting style. Sounds easy enough, but since it is a WEDDING DRESS, it is also very scary. I have never been so nervous to start a sewing project, in fear of making a total mess of it.

Well, now there are pins in it. I haven't let the scissors touch it yet, and I need a new needle for my sewing machine (a 60/8 to be exact), but I think I am more mentally prepared for the project. I have also miraculously found a slip that fits perfectly under my dress: it is long, simple, has no frills or lace and just the perfect silhouette. It was also half price, which matters a lot when you buy silk! Now I don't have to worry about sewing a new lining, and can go with Plan A.

PS. Sewing art by Ello Lovey


Thursday, March 14, 2013

Stop shop update


Two and a half months into my stop shop project, and it is time for a real update.

It is still easy to not buy new clothes, but I have acquired a few things in other ways: a pair of jeans handed down from my sister, some earrings my mom found in her jewelry box, and a second hand sweater. I ask myself the question: are these gifts or not? And in borderline cases I will still try to practice my "one item in, one out" rule.

The jeans from my sister was easy, I just replaced them with an old washed out out pair in the same color, even from the same store! The sweater is more of a head sore, and I have a hard time choosing which one to part with now. Perhaps this is the bigger struggle for me, actually parting with some of my things. I think I just like them too much sometimes.

There hasn´t been too much time for DIYs and projects yet, but perhaps now that spring is knocking on my door. One of the sewing projects I hope to finish this year is a top in the vintage pattern above. The half finished 70s tunic has been waiting for way too long, and I want to wear it soon. Maybe this spring?

PS. For updates from my Latvia outreach, check YWAM Skiens blog.

Sunday, January 20, 2013

Restyle: Patch him up!


This vintage thrifted Benetton sweater is a favorite. The softness and comfort is no surprise, since there is 22% angora in it. 

Unfortunately it had lots of tiny little holes, and with no shopping in addition to my love for this garment, mending was in place. I decided to add elbow patches (found in my sewing kit), and lots of stitches later, I am happy with the result. I am very grateful I know how to use a needle and some thread! 


PS. I added a category and page for all resolution related posts: Live Simply.

Saturday, October 6, 2012

DIY inspiration from Jenny Skavlan

I came across this excerpt from a refashion book by Jenny Skavlan. Check it out for some easy DIY inspiration (and maybe you will put the rest of the book on your wishlist?

Friday, December 30, 2011

2011: Some highlights

2011 was the first year I blogged from beginning to end. It is so much fun to have memories recorded this way. Looking back on the year, here are some of the highlights:

January:

One of the before´s


February: 


March:
(I was intrigued again this Christmas by the recent movie) 


April:


May:
My very own home! (not much time for blogging...) and seeing Sufjan

Picture by Jordan Sanchez

June:


July:


August: 
A good month for restyling and festivals

Restyled table

September: 


October:

Teammates in Macedonia


November: 


December: 


Thank you so much to all of you who follow, read and comment here on this little blog, I am grateful that you take time reading my stories! What about you, what are some of your highlights this year?


PS. If this wasnt enough, the full archives can be found on your right hand side, where you can browse by date or category.

LinkWithin

Related Posts Plugin for WordPress, Blogger...